
A small kitchen doesn’t mean settling for clutter, inefficiency, or a cramped workspace. With the right strategies, even a galley-style or single-wall layout can deliver full functionality and visual appeal. The key lies in leveraging every square inch, vertical surfaces, underutilized corners, and overlooked wall space, while making smart choices about color, materials, and layout. This guide walks through fifteen practical ideas that maximize storage, improve workflow, and create the illusion of a larger footprint without knocking down walls or waiting for a full remodel.
Key Takeaways
- Maximize vertical space by extending cabinets to the ceiling, installing floating shelves 18–20 inches above countertops, and using pegboards or rail systems to free up drawer and counter space.
- Kitchen ideas for small spaces thrive with multi-functional furniture like rolling carts, drop-leaf tables, and combination appliances that reduce footprint while maintaining full functionality.
- Light colors, reflective surfaces, and glass-front cabinets create the illusion of a larger kitchen without costly renovations or structural changes.
- A compact work triangle between sink, stove, and refrigerator (12–22 feet total) optimizes flow in galley and L-shaped layouts while maintaining safe clearances.
- Visual design tricks such as vertical tile patterns, handleless cabinets, and one bold focal point make small kitchens feel taller and wider without clutter.
- Start with one or two high-impact changes like open shelving or slimline appliances, then layer additional upgrades to build a functional, larger-looking space over time.
Maximize Vertical Space with Smart Storage Solutions
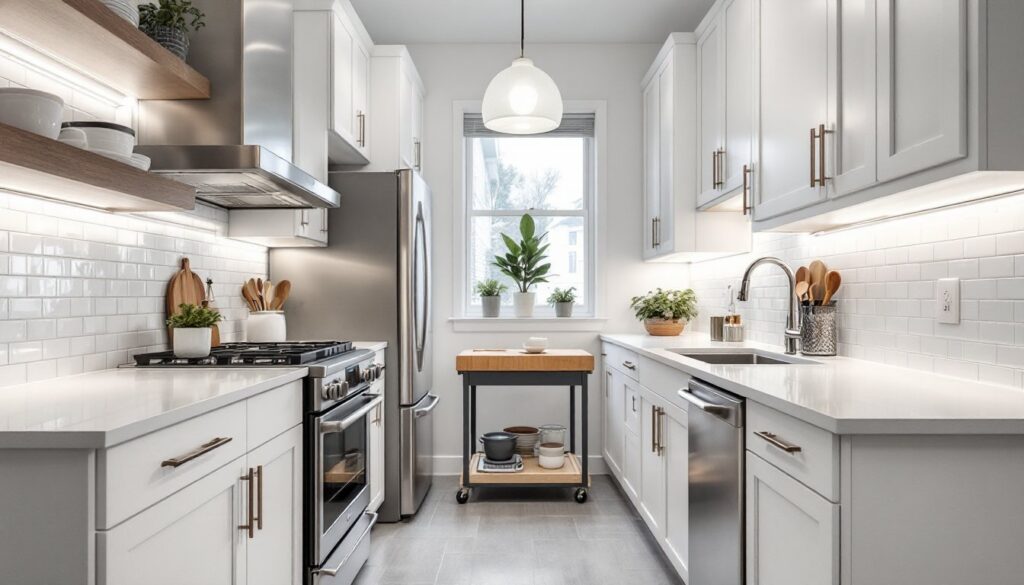
Small kitchens often waste the most valuable real estate: the upper third of the walls and the space between the counter and ceiling. Floor-to-ceiling cabinetry pulls storage upward, turning dead space into pantry capacity. Extending upper cabinets to the ceiling eliminates dust-collecting gaps and provides room for seasonal items or rarely used appliances.
Open shelving works when cabinets feel too heavy or budgets are tight. Floating shelves mounted on heavy-duty brackets (rated for at least 50 lbs per pair) can hold everyday dishes, spices, or glassware. Keep them to 10–12 inches deep to avoid visual bulk. Install them 18–20 inches above countertops for comfortable reach without head clearance issues.
Pegboards and rail systems offer flexible, wall-mounted storage for utensils, pots, and cutting boards. A stainless steel rail with S-hooks keeps tools within arm’s reach and frees up drawer space. Mount rails to studs or use toggle bolts in drywall for secure attachment.
Don’t overlook the inside of cabinet doors. Adhesive hooks, shallow racks, or magnetic strips can hold lids, measuring spoons, or knives. A pull-down spice rack mounted inside an upper cabinet door puts dozens of jars at eye level without consuming shelf depth.
Corner cabinets typically become black holes. Retrofit them with lazy Susans or pull-out corner organizers to recover lost square footage. These systems ride on full-extension ball-bearing slides and cost $60–$150 depending on size and material grade.
Choose Multi-Functional Furniture and Appliances
Every piece in a small kitchen should earn its footprint. Rolling carts with butcher-block tops add prep surface and storage, then tuck under counters or into corners when not in use. Look for models with locking casters to prevent drift during chopping.
A drop-leaf or fold-down table mounted to the wall serves as a breakfast bar, prep station, or laptop desk, then folds flat to reclaim floor space. Install it at 36 inches high (standard counter height) and anchor it to wall studs with heavy-duty hinges rated for the span.
Combination appliances shrink the appliance footprint. A microwave-convection oven combo eliminates the need for a separate toaster oven. Dishwasher drawers (18 inches wide) fit where full-size units can’t. A two-burner induction cooktop leaves more counter space than a traditional range and requires only a 240V circuit if hardwired.
Consider slimline appliances: 24-inch ranges instead of 30, 18-inch dishwashers, or counter-depth refrigerators that sit flush with cabinetry. Counter-depth models sacrifice a few cubic feet but open up walkways and eliminate the boxed-in feel of a protruding fridge.
Pull-out cutting boards and integrated trash bins hide inside base cabinets, keeping surfaces clear. A toe-kick drawer (the 4-inch recess under base cabinets) can hold baking sheets, placemats, or pet bowls, wasted space turned functional with a custom drawer kit available from most cabinet suppliers.
Embrace Light Colors and Reflective Surfaces
Color and finish choices dramatically affect perceived size. White, off-white, and pale gray cabinets bounce light and recede visually, making walls feel farther apart. High-gloss or semi-gloss cabinet finishes reflect more light than matte, amplifying the effect. Pair them with light-toned countertops, white quartz, pale granite, or butcher block in natural maple, to maintain visual continuity.
Glass-front cabinet doors break up solid runs of cabinetry and add depth. For a cleaner look, back the glass with white or mirrored panels instead of exposing cabinet contents. Frosted or reeded glass offers privacy while still transmitting light.
Mirrored backsplashes or large-format tiles with a glossy glaze reflect task lighting and windows, doubling perceived brightness. A 4×12-inch subway tile in a high-gloss finish is classic and easy to clean. Install it in a horizontal stack bond or herringbone pattern for added visual interest without busy contrast.
Under-cabinet LED strip lighting eliminates shadows and highlights backsplash materials. Choose 3000K color temperature for warm white that doesn’t skew sterile. Hardwire the strips to a wall switch or plug them into an outlet with an inline dimmer for control.
Avoid heavy contrast. Dark lower cabinets with light uppers can work, but a two-tone scheme in a small kitchen risks chopping the space visually. If contrast is desired, keep it subtle, pale gray lowers with white uppers, for example.
Optimize Your Layout for Better Flow
Layout determines whether a small kitchen feels cramped or efficient. The work triangle, the path between sink, stove, and refrigerator, should total between 12 and 22 feet for smooth workflow. In tight quarters, a compact triangle prevents wasted steps.
Galley and L-Shaped Configurations
A galley layout (two parallel walls) maximizes efficiency in narrow spaces. Keep the aisle width between 42 and 48 inches, narrower feels tight, wider wastes space. Place the sink and stove on one side, the refrigerator on the other, to avoid bottleneck traffic.
An L-shaped layout wraps two adjacent walls, leaving one or two sides open for better flow and the option of a small table. Position the sink under a window (if present) for natural light, and cluster the stove and fridge within easy reach. An L-shape also accommodates a peninsula or small island without blocking pathways.
Avoid placing the refrigerator at the end of a run where the door swing blocks the aisle. Swap hinge sides if needed or choose a counter-depth model with a reduced swing radius.
Clearances matter: leave at least 15 inches of counter on the handle side of the refrigerator for landing space, and 12–18 inches on either side of the cooktop for safe pot placement. If space is too tight, use a portable induction burner on a rolling cart to shift cooking zones as needed.
Create Illusions of Space with Design Tricks
Visual tricks can make walls appear taller and rooms feel wider. Vertical tile patterns or shiplap paneling draw the eye upward, emphasizing height. Run subway tile in a vertical stack or install beadboard wainscoting with grooves oriented vertically.
Minimal window treatments preserve light and sightlines. Skip heavy curtains in favor of cellular shades or café-style half curtains that cover only the lower sash. If privacy isn’t a concern, leave windows bare, every lumen counts.
Handleless cabinets with push-to-open mechanisms or recessed pulls reduce visual clutter and the physical obstruction of protruding hardware. Alternatively, use slim bar pulls in a finish that matches the cabinet color for a streamlined look.
Open floor plans help, but if the kitchen is fully enclosed, consider borrowing light from adjacent rooms. A pass-through window or interior transom above the doorway can pull in daylight without sacrificing wall space for upper cabinets.
One large-scale element can anchor a small kitchen without overwhelming it. A single bold backsplash in patterned tile or a statement pendant light over the sink adds personality. Keep everything else neutral to let the focal point shine.
Floating shelves and wall-mounted faucets (where plumbing allows) reduce visual mass. A wall-mount pot filler over the stove eliminates the need to carry heavy pots from sink to burner and keeps counter clutter down.
Conclusion
A small kitchen becomes highly functional when every design choice serves a purpose. Vertical storage, multi-use furniture, light finishes, and smart layouts turn constraints into advantages. Start with one or two high-impact changes, adding open shelving, swapping in slimline appliances, or repainting cabinets, and layer in additional upgrades as budget and time allow. The result is a space that works harder, looks larger, and supports daily cooking without compromise.