
Light sage green has quietly become one of the most sought-after cabinet colors in modern kitchens, and for good reason. It’s soft enough to feel calming without reading bland, bold enough to anchor a space without overwhelming it, and remarkably adaptable across design styles. Unlike stark whites or trendy navy blues that can feel cold or dated, sage green brings warmth, character, and a connection to nature that homeowners are increasingly craving. This guide walks through everything needed to pull off light sage green cabinets successfully: choosing the right paint and finish, pairing them with countertops and backsplashes that elevate the look, selecting hardware that complements rather than competes, and maintaining the finish over time. Whether updating existing cabinets or planning a full kitchen remodel, the details below will help turn sage green from a Pinterest idea into a functional, beautiful reality.
Key Takeaways
- Light sage green kitchen cabinets offer a timeless, versatile color that works across modern, farmhouse, and traditional styles without feeling trendy or polarizing.
- Choose cabinet-grade paint in satin or semi-gloss finish—like Benjamin Moore Advance or Sherwin-Williams Emerald—and never skip primer; proper prep with degreaser, 150-grit sanding, and bonding primer ensures durability.
- Pair sage green cabinets with white or cream quartz countertops for contrast, natural wood butcher block for warmth, or black quartz for modern drama, and keep backsplash choices simple with white subway or soft tile.
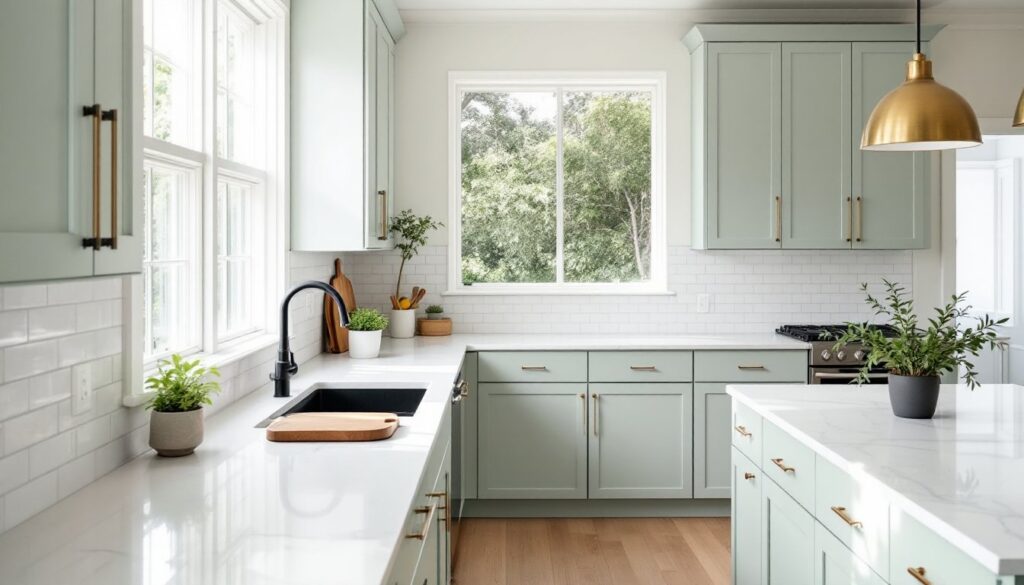
- Select brass or matte black hardware in 3–6 inch sizes to complement sage green without competing; match faucet and lighting fixtures to the same metal family for cohesive design.
- Allow 7 days curing time after painting before fully closing cabinet doors, and maintain the finish by wiping regularly with mild dish soap, touching up chips immediately, and avoiding harsh cleaners.
Why Light Sage Green Is the Perfect Kitchen Cabinet Color
Light sage green occupies a rare sweet spot: it’s distinctive without being polarizing. Unlike bold jewel tones that demand attention, sage recedes just enough to let other elements, countertops, flooring, fixtures, share the stage. It pairs beautifully with natural materials like wood, stone, and brass, making it ideal for kitchens that lean organic or rustic.
The color also has staying power. Sage green has roots in historical palettes, think Federal-era homes and English country kitchens, so it doesn’t feel like a fleeting trend. At the same time, it reads fresh and current, especially in lighter iterations that avoid the heavy, forest-green vibes of decades past.
From a practical standpoint, light sage hides wear better than pure white. Minor scuffs, dust, and grease shadows are less visible on a muted green than on bright or dark extremes. It’s also forgiving in varied lighting conditions. Where some colors shift dramatically between natural and artificial light, sage maintains its soft, muted character throughout the day.
Finally, sage green works across budgets. It looks just as compelling on frameless, slab-door cabinets in a minimalist kitchen as it does on Shaker-style doors in a farmhouse remodel. The color itself does much of the heavy lifting, which means homeowners don’t need expensive hardware or elaborate tile work to make the space feel intentional.
Best Paint Colors and Finishes for Light Sage Green Cabinets
Choosing the right paint is critical, cabinet paint needs to withstand constant contact, moisture, and cleaning. For DIYers painting existing cabinets, Benjamin Moore Advance and Sherwin-Williams Emerald Urethane Trim Enamel are top-tier choices. Both are water-based, self-leveling, and cure to a hard, durable finish that resists chipping.
Popular light sage green shades include Benjamin Moore’s “Saybrook Sage” (HC-114), Sherwin-Williams “Clary Sage” (SW 6178), and Farrow & Ball’s “Vert de Terre” (234). Saybrook Sage leans slightly gray and works well in kitchens with cool-toned countertops. Clary Sage has a warmer, earthier base that complements wood tones and brass fixtures. Vert de Terre is more muted and sophisticated, ideal for traditional or transitional spaces.
Finish matters as much as color. For cabinets, a satin or semi-gloss finish is recommended. Satin offers a soft sheen that’s easy to wipe down and hides minor imperfections. Semi-gloss is more durable and moisture-resistant, making it better for high-traffic kitchens or areas near the sink and stove. Matte and flat finishes look beautiful but show fingerprints, grease, and water spots quickly, they’re not practical for cabinets.
Prep work is non-negotiable. Cabinets must be cleaned with a degreaser like TSP (trisodium phosphate), lightly sanded with 150-grit sandpaper, and primed with a bonding primer such as Zinsser B-I-N or Kilz Adhesion. Skipping primer, especially on glossy or laminate surfaces, leads to poor adhesion and premature peeling. Apply paint in thin, even coats with a high-density foam roller or an HVLP sprayer for the smoothest finish.
Countertop and Backsplash Pairings That Elevate Sage Green Cabinets
Sage green cabinets are versatile, but countertop and backsplash choices can make or break the look. The goal is balance, complement the green without competing with it or letting the space feel flat.
White and off-white countertops are the safest bet. Quartz in shades like Caesarstone “Frosty Carrina” or Cambria “Torquay” offers the look of marble without the maintenance. These provide a clean, bright contrast that keeps sage green from feeling too earthy or muted. For a warmer feel, consider creamy whites or beiges like quartzite in “Taj Mahal” or quartz in “Calacatta Laza.”
Natural wood butcher block is another strong pairing, especially in farmhouse or Scandinavian-inspired kitchens. Maple, oak, or walnut butcher block brings warmth and texture, grounding the soft green. Just be prepared for regular maintenance, wood countertops need oiling and can stain or scratch.
Black or charcoal countertops add drama and work well in modern or industrial-style kitchens. Soapstone, honed black granite, or matte black quartz creates a moody, high-contrast look. This pairing works best when balanced with lighter walls and plenty of natural light.
For backsplashes, white subway tile is timeless and budget-friendly. A 3×6 white ceramic tile with gray grout keeps things crisp without stealing focus. For more personality, consider handmade or zellige tile in soft white, cream, or even a complementary green. Marble slab backsplashes (especially Carrara or Calacatta) feel elegant and pair beautifully with sage cabinets, but come at a higher price point. Avoid overly busy patterns or bold colors that clash with the green, sage works best when it’s the anchor, not one of many competing elements.
Hardware and Fixture Choices for Light Sage Green Kitchens
Hardware is where personality and function intersect. The right pulls and knobs can amplify sage green’s natural warmth or shift the kitchen toward sleek modernity.
Brass and gold-tone hardware are the most popular pairings. Unlacquered brass develops a patina over time, adding character. Brushed or satin brass offers the warmth of gold without the shine or upkeep. Brands like Emtek, Amerock, and Rejuvenation offer solid options in multiple finishes. Avoid bright, shiny gold unless going for a maximalist look, it can feel dated quickly.
Matte black hardware works beautifully in modern or transitional kitchens. Black cup pulls, knobs, or T-bar handles create strong contrast and keep the space grounded. This combination works especially well when paired with black countertops or black-framed windows.
Brushed nickel or stainless steel are safe, neutral choices that won’t date. They’re practical in kitchens with stainless appliances and keep the palette cool-toned. But, they can feel generic if not balanced with warmer elements elsewhere.
Faucet and lighting fixtures should follow the same metal family as hardware for cohesion. A brass or matte black faucet ties the look together. For lighting, consider brass or black pendant lights over an island, or a simple flush-mount or semi-flush fixture in a coordinating finish. Avoid mixing more than two metal finishes in a small kitchen, it can look cluttered and unintentional.
When selecting hardware size, pulls should be 3–4 inches for drawers and 4–6 inches for cabinet doors, depending on door width. Test placement before drilling, hardware positioned too high or too low throws off the visual balance.
Designing With Light Sage Green: Modern, Farmhouse, and Traditional Styles
Light sage green adapts to multiple design styles, but each requires slightly different supporting elements.
Modern kitchens pair sage cabinets with sleek, slab-door fronts, integrated handles or push-to-open mechanisms, and minimal ornamentation. Countertops in white quartz or concrete, a simple subway or large-format tile backsplash, and matte black or stainless hardware keep the look clean and uncluttered. Lighting should be geometric, think linear pendants or minimal dome shades in black or brass.
Farmhouse kitchens lean into warmth and texture. Shaker-style cabinet doors, butcher block countertops or open shelving, and apron-front sinks are natural companions to sage green. Add unlacquered brass hardware, beadboard or shiplap accents, and vintage-inspired pendant lights with Edison bulbs. A patterned cement tile floor or wide-plank hardwood ties the rustic look together. Open shelving in natural wood adds function and display space without overwhelming the green.
Traditional kitchens benefit from raised-panel or beaded-inset cabinet doors, marble or granite countertops, and classic subway or arabesque tile. Choose hardware with traditional detailing, bin pulls, cup handles, or ornate knobs in brass or bronze. Crown molding, under-cabinet lighting, and a decorative range hood add refinement. Keep the color palette soft: creams, whites, and warm grays work better than stark contrasts.
No matter the style, balance is key. Sage green is a supporting actor, not the entire show. Let natural materials, good lighting, and thoughtful details do the rest of the work.
Practical Tips for Installing and Maintaining Sage Green Cabinets
Whether painting existing cabinets or installing new ones, careful prep and execution make the difference between a DIY success and a costly redo.
If painting existing cabinets:
- Remove all doors, drawers, and hardware. Label everything with painter’s tape to simplify reassembly.
- Clean all surfaces with a degreaser like TSP substitute. Let dry completely.
- Sand lightly with 150-grit sandpaper to scuff the existing finish. Wipe away dust with a tack cloth.
- Apply a bonding primer (Zinsser B-I-N or Kilz Adhesion). This step is critical for adhesion, especially on glossy or laminate surfaces.
- Paint with two thin coats of cabinet-grade paint in your chosen sage green. Allow 16–24 hours of dry time between coats.
- Let cabinets cure for at least 7 days before reinstalling hardware and closing doors fully. Premature use leads to sticking and marring.
For new cabinet installation:
Hire a professional if working with a full kitchen remodel or if cabinets need to be shimmed and leveled on uneven floors. Installing upper cabinets safely requires at least two people and a laser level to ensure alignment. Securing cabinets into wall studs, not just drywall, is essential for load-bearing safety. Use 3-inch cabinet screws driven into studs located with a stud finder.
Ongoing maintenance:
- Wipe cabinets regularly with a damp microfiber cloth and mild dish soap. Avoid harsh cleaners, which can dull the finish.
- Clean grease buildup near the stove with a degreasing spray designed for painted surfaces.
- Touch up chips or scratches immediately with leftover paint. Feather the edges with a small brush to blend.
- Avoid hanging wet towels or placing hot pots directly on cabinet surfaces.
If cabinets begin to yellow over time (a rare issue with water-based paints), it’s usually due to poor ventilation or exposure to heat and grease. A fresh topcoat every 5–7 years keeps them looking new.
Conclusion
Light sage green cabinets offer a rare combination of timeless appeal and practical versatility. With the right paint, thoughtful material pairings, and attention to detail during installation and maintenance, they can anchor a kitchen that feels both current and enduring. The color works across styles, budgets, and skill levels, making it accessible whether tackling a weekend paint project or planning a full remodel. Focus on quality prep, choose complementary finishes, and don’t rush the process, sage green rewards patience and precision.