
Green backsplash kitchens are having a serious moment, and for good reason. Unlike short-lived color trends that fade as fast as they arrive, green brings a grounded, organic quality that works across design styles, from farmhouse to modern. Whether it’s a soft sage, bold emerald, or light green backsplash kitchen that opens up the room, this color choice adds depth without dominating the space. For homeowners looking to refresh their kitchens with something more distinctive than subway white or gray, green delivers both personality and staying power. This guide walks through shade selection, materials, design pairings, and practical installation advice to help anyone confidently bring this timeless trend into their home.
Key Takeaways
- A green backsplash kitchen combines aesthetic appeal with practical durability, hiding water spots and grout discoloration better than white or dark tiles while adapting seamlessly to both natural and artificial lighting.
- Green tile comes in versatile shades—from soft sage and light green to bold emerald and earthy olive—allowing homeowners to match their design style, whether farmhouse, modern, Mediterranean, or bohemian.
- Ceramic and porcelain tiles offer the most budget-friendly option ($2–$8 per sq ft), while glass tiles ($12–$30 per sq ft) create stunning luminous effects and natural stone ($15–$50+ per sq ft) adds organic elegance to your backsplash.
- A green backsplash pairs effortlessly with white or cream cabinets, natural wood, and neutrals like quartz or marble counters, making it one of the most flexible color choices for kitchen design.
- Proper installation requires surface prep, a dry fit layout, careful thinset application, and sealed grout, but DIYers can tackle this project successfully with a level, notched trowel, and patience.
Why Choose a Green Backsplash for Your Kitchen
Green occupies a unique position in kitchen color theory. It’s naturally calming, studies show green tones reduce eye strain and promote focus, but it also reads as fresh and lively when used in glossy tile or bold saturation. Unlike stark whites that show every splatter or trendy blacks that can shrink a space, green adapts to both natural and artificial lighting without losing character.
From a design standpoint, green functions as a neutral with personality. It pairs effortlessly with warm wood tones, complements stainless steel appliances, and provides contrast against white or cream cabinetry without clashing. Homeowners who want a kitchen that feels curated but not overly styled find green hits that balance.
Practically, green hides minor grout discoloration better than lighter shades and doesn’t show water spots as readily as darker charcoals. For kitchens with heavy cooking activity, steaming pots, oil splatter, daily use, a mid-tone green backsplash holds up visually between deep cleans. It’s forgiving in a way that pure white or matte black isn’t.
Popular Shades of Green for Kitchen Backsplashes
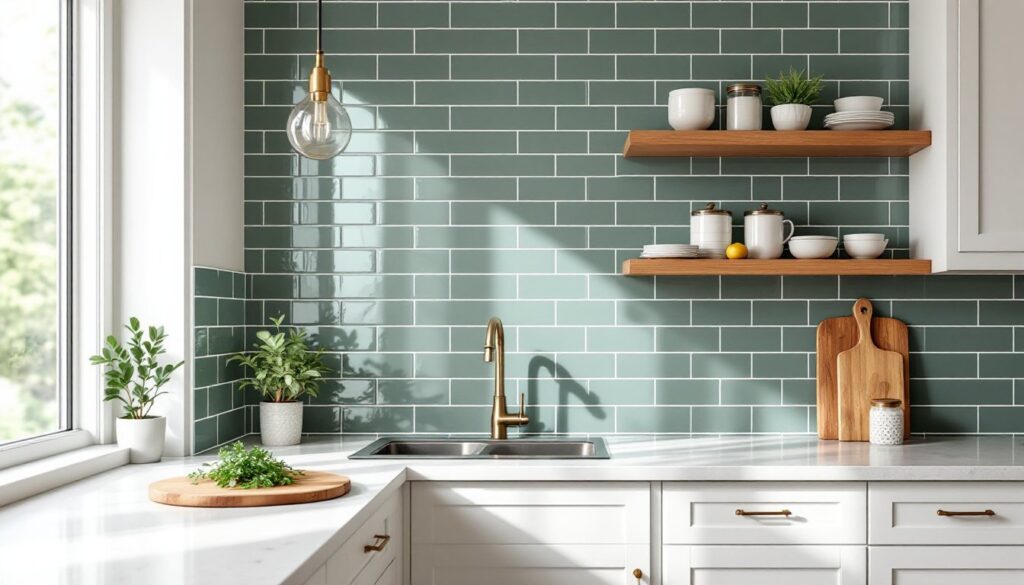
Sage and Light Green: Soft, muted greens with gray undertones are the workhorses of this trend. A light green backsplash kitchen feels open and airy, especially in compact or north-facing spaces that lack natural light. These shades work well in farmhouse and transitional styles, pairing beautifully with brushed brass fixtures and natural wood accents. Expect a subtle, almost neutral backdrop that won’t overwhelm other design elements.
Emerald and Hunter Green: Deep, saturated greens make a statement. Emerald tiles with a glossy finish reflect light and add richness to modern or eclectic kitchens. Hunter green, slightly more muted, leans traditional and pairs well with dark cabinetry or soapstone counters. These shades require confidence, they dominate a space, but when done right, they create a jewel-box effect that feels luxurious.
Mint and Seafoam: Pastel greens with blue undertones bring a retro or coastal vibe. Mint works in mid-century modern kitchens, especially with checkerboard patterns or vintage appliances. Seafoam leans beachy and casual, ideal for open-plan homes with lots of natural light. Both shades feel playful without being childish, though they’re harder to pair with warm wood tones.
Olive and Moss: Earthy, muted greens with brown or yellow undertones ground a kitchen. Olive backsplashes work in Mediterranean or rustic designs, while moss pairs well with natural stone counters and raw wood shelving. These shades feel organic and timeless, less susceptible to trend cycles than brighter options.
Best Materials for Green Kitchen Backsplashes
Ceramic and Porcelain Tile: The most common backsplash material, available in countless green shades and finishes. Ceramic is budget-friendly (around $2–$8 per square foot), easy to cut with a wet saw, and holds up well to heat and moisture. Porcelain, denser and less porous, costs slightly more but resists staining better. Both accept standard thinset adhesive and sanded grout. For DIYers, 3×6-inch subway tiles are the easiest to install, fewer cuts, forgiving layout.
Glass Tile: Glass delivers color depth that ceramic can’t match. Light passes through the tile, creating a luminous effect that shifts with changing daylight. Green glass tiles range from translucent sea glass styles to opaque, richly saturated hues. Expect to pay $12–$30 per square foot. Installation requires unsanded grout (sanded versions scratch the surface) and a white thinset to avoid color show-through. Cutting glass tile demands a quality wet saw with a glass blade: chipping is common with cheaper tools.
Natural Stone: Marble, quartzite, and slate offer green tones in veined or solid patterns. Green marble (like Ming Green) brings elegance but requires sealing every 6–12 months to prevent staining. Slate provides texture and an earthy, matte finish, but its uneven surface makes cleaning grout lines more labor-intensive. Stone costs $15–$50+ per square foot and typically requires professional installation due to weight and cutting difficulty.
Peel-and-Stick Tile: Adhesive-backed tiles offer a low-commitment option for renters or budget-conscious DIYers. Quality has improved, brands now offer realistic glass and ceramic looks, but durability remains a concern near high-heat zones. Peel-and-stick works best as a temporary update or in low-moisture areas. Expect $1–$5 per square foot.
Green Backsplash Design Styles and Patterns
Subway Layout: The classic 3×6-inch brick pattern remains the most popular for a reason, it’s clean, timeless, and doesn’t compete with other design elements. A green subway tile backsplash works in virtually any kitchen style. Running bond (offset by half) is standard, but stacked (grid) layout offers a modern twist.
Herringbone and Chevron: Diagonal patterns add movement and visual interest. Herringbone (tiles meet at 90-degree angles) and chevron (tiles are cut at angles to form a continuous zigzag) both require more material (expect 15–20% overage for cuts) and more labor. These patterns shine with smaller tiles, 2×4-inch or 1×3-inch formats, in a single shade of green.
Zellige and Handmade Tile: Moroccan zellige tiles bring an artisan, slightly imperfect look. Their subtle color variations and glossy, uneven glaze create depth. Green zellige works in bohemian, Mediterranean, or modern farmhouse kitchens. Installation is more forgiving since the tiles aren’t meant to be perfectly aligned, but inconsistent sizing requires skilled spacing.
Mosaic and Mixed Materials: Small-format mosaics (1×1-inch or hexagon) allow for color gradients or mixing green with neutrals. Sheet-mounted mosaics simplify installation but cost more ($10–$25 per square foot). Mixing glass and stone or pairing green tiles with white creates custom patterns without the need for custom fabrication.
Pairing Your Green Backsplash with Cabinets and Countertops
White or Cream Cabinets: This is the safest, most versatile pairing. White cabinets let a green backsplash take center stage without visual competition. Warm whites (with cream or beige undertones) pair best with olive or sage, while bright whites complement emerald or mint. Shaker-style doors in white keep the look classic: slab doors lean modern.
Natural Wood Cabinets: Light woods like oak, maple, or birch warm up sage and light green backsplashes. Darker woods, walnut, cherry, pair beautifully with deep hunter or emerald greens, creating a rich, layered look. Avoid pairing cool-toned greens (mint, seafoam) with warm wood unless there’s a third neutral (like white counters) to bridge the gap.
Dark or Navy Cabinets: Bold cabinetry needs a backsplash that holds its own. Deep emerald or moss green with a glossy finish provides contrast without clashing. This combination works best in larger kitchens with ample natural light: in smaller spaces, it can feel heavy.
Countertop Considerations: White quartz or marble counters are foolproof with any green shade. Butcher block or wood counters pair well with earthy greens (olive, moss, sage). Gray or black granite works with cooler greens (mint, seafoam) but can feel stark with warmer tones. Avoid busy granite patterns with patterned green tile, one or the other should be the focal point, not both.
Installation and Maintenance Tips
Surface Prep: Remove old backsplash material down to bare drywall or cement board. Fill any holes with joint compound, sand smooth, and wipe clean. If installing over drywall in a high-moisture area (near the sink), consider a waterproof membrane or cement board backer. Skipping this step invites mold issues down the line.
Layout and Dry Fit: Mark a level line using a laser level or 4-foot spirit level. Start at the most visible section (usually centered behind the stove or sink) and work outward. Dry-fit tiles before mixing thinset to identify cuts and ensure the pattern works. For subway tiles, use 1/8-inch spacers for tight grout lines or 3/16-inch for a more rustic look.
Installation Process: Mix thinset mortar to a peanut-butter consistency. Apply with a 1/4-inch notched trowel, holding it at a 45-degree angle to create ridges. Press tiles firmly, twisting slightly to ensure adhesion. Work in small sections (3–4 square feet) to prevent thinset from skinning over. Let cure for 24–48 hours before grouting.
Grouting: Use sanded grout for joints wider than 1/8-inch, unsanded for tighter lines or glass tile. Mix to a toothpaste consistency, apply with a rubber float at a 45-degree angle, and wipe excess with a damp sponge. Buff haze with a microfiber cloth after 20–30 minutes. Seal grout after 72 hours with a penetrating sealer.
Maintenance: Wipe green tile backsplashes weekly with a pH-neutral cleaner (dish soap and water work fine). Avoid acidic cleaners (vinegar, citrus-based) on natural stone, they etch the surface. Reseal stone and grout annually. For glossy tile, a squeegee after cooking prevents water spots and keeps the shine.
Conclusion
A green backsplash kitchen brings color, character, and practicality to one of the home’s hardest-working spaces. From soft sage to bold emerald, the range of shades and materials ensures there’s a fit for every style and skill level. With proper planning, surface prep, and material choice, this project delivers long-term impact without requiring professional help, just patience, a level, and a willingness to measure twice.